Category Archives: Linux

Linux related topics. It includes server, desktop and embedded platforms

Ryzen 5950x workstation update

As my previously post indicated I have created a new workstation, Components for New workstation, based on the Ryzen 5950x. This post is a follow-up, where I will present a minor change to the build, the build itself, results from a benchmark with Yocto and lastly my general view on the workstation and what I would change if I had the change.

Changes

In my previous post I stated that I went for the Seasonic Focus PX 850. Unfortunately availability of seasonic PSUs was very limited and everything above 650 watt completely out of stock. So based on availability I ended up with Seasonic Prime TX 650 – 80 Plus Titanium. This is a very nice PSU – including hybrid fan control making it a very silent PSU. Also this build uses well below 650 watt, but I prefer the PSU to be oversized, as the fan speed, and by this the noise increase with load percent. Though the difference in load percent is more than compensated by being the Titanium model with 135mm fan and better fan control compared to the 120mm of the PX model I originally intended to use.

The build

The build was pretty straight forward, though with a very tight fit, mostly caused by the size of the CPU cooler. I took some quick shots of the process, you can see below.

Components arrived for the workstation
The CPU in the motherboard
Assembled the hardware in the case. Still missing power. Notice the CPU fan touching the memory, and the tight fit for the graphic card.
Final result, while running memory test

If you look at the last photo, you can see the tight fit around the graphic card and the CPU cooler. The fan of the cooler is also touching the memory, so no room to spare. The M.2. sits under the fan also. So be aware that all the space around the CPU cooler is used. A minor annoyance is how the Corsair MP600 with its own cooler attached, collides with the M.2. cooler plate for the motherboard. I needed to remote the chipset fan grill to remove the plate for using the MP600, and as I could not use the motherboard plate, the chipset fan grill could not be mounted again. Later i was informed how to remove the heatsink on the MP600, so the heatsink from the motherboard could be used, so would change this in a rebuild.

Yocto benchmark

Martin ‘JaMa’ Jansa who is a WebOS developer at LG and core developer of OpenEmbedded, provide a benchmark over different CPUs with the test-oe-build-time.

If you look at the time.build tab of html result, the build time for this system is around 2:37:29 for zeus branch and 3:41:26 for hardknott branch. In comparison building the zeus branch on Threadripper 3970x takes 1:36:18, a dual socket Xeon E5 2699 v3 takes 2:40:26 and a dual socket Xeon E5 2698 v4 takes 2:18:41.

I don’t have the price of the reference systems, but looking into the CPUs, a single Xeon E5 2699 v3 is $4115.00, a single Xeon E5-2698 v4 is $3226.00, a Threadripper 3970x reference price is $1999.. and my chosen Ryzen 5950x is $799.00. So if you compare the results according to price, you get the most bang for the buck with the chosen workstation.

Conclusion

In general I am very happy with the workstation. Running with the quiet profile in the BIOS and setting the RPM down, means the workstation is for all practical purpose silent when idling and only a woosh sound when under heavy load.

The only thing I properly would change is the Corsair MP600. I ended up patching the kernel because of a firmware bug with the SUBNQN. I documented it in their forum. This combined with a number of people report slowdown, and the small issue with not having the fan grill on the chipset because of the attached cooler, means that I would properly go with a Samsung 980 Pro if I needed to do the build again.

Hope you can use the comments and please comment if you have any questions.
Components for New workstation

I have been thinking on upgrading my old Intel(R) Core(TM) i7-4770S based workstation for some time, and with the launch of Ryzen 5000, the time was right.

This time around I also choose to created a clean build, compared to previously upgrades. My current workstation still uses a Chieftec Dragon big tower I bought when I was in high-school 17 years ago, so it includes some very old components.

Before designing this build, I did some reflection about what I need from my workstation. It ended up as the following list.

  • Quietness – I detest noise, so target is a machine where it is basically silence when idle, and with a soothing “whoosh” sound compared to a whining when under heavy load. This also means that the motherboard needs to have decent fan control.
  • Stability – The most basic part of a stable build is power delivery. So I choose component used for overclocking and then _not_ overclock.
  • Performance – Here the focus is CPU / memory as I don’t game. This workstation is first and foremost for developing where part of this is compilation and doing yocto builds. For building / compilation, this means as many cores as possible. As I have a wish for using ramfs for all build outputs, I end up needing above 50G for the yocto build folder, combined with the memory needed for actually running the build processes.

So let me present the chosen components, which ended up being a maxed out AM4 platform.

CPU

The chosen CPU is the new Ryzen 5000 based 5950x with 16 cores / 32 threads and 64 MB of L3 cache.

I was looking at the Threadripper parts like the 3970x, but when taking the price of this CPU (around 15.000 DKK) into account, it was just to expensive for my personal rig, compared to the newer Ryzen 5000 series, where the 5950x as I have ordered goes for 6400 DKK.

If I would design the workstation for my workplace, it would without a doubt be based on the Threadripper platform, because of the increased memory bandwidth (4 channels versus 2 channels) and 88 PCIe lanes compared to the 20 lanes on my 5950x.

A good thing of the 5950x compared to a part like the 3970x is a higher single-thread performance, as it boost to 4.9 GHz, and the Zen3 in general has higher performance than Zen2. This is important when linking binaries among others, as it happens as a single threaded workload. I often end up with changing only a few files before compilation – so linking end up being a significant part of the development cycle.

Memory

My starting point was 2G of memory per thread, e.g. 64G to fit the CPU. But as previously stated I want to use memory also as part of the filesystem so all the object files / temp files from compilation is written to a ramdisk instead of physical writing them to a disk. To support the type of Yocto builds I do, I choose 128G as my needed memory.

First I looked on ECC memory, but the significant increased price, and appertaining slowdown because of the ECC check compared to cheaper and faster normal DDR4 made me choose the normal DDR4. Needing 128G of memory reduced the number of good kits, as I want a max of CL16 and minimum able to run 3600 MHz. The speed of the memory significantly influence the CPU, as it is only dual channel for 32 threads.

I ended up choosing Crucial – model BL2K32G36C16U4B.

They give me a timing of 16-18-18-38 for PC-28800 at 1.35 volt, with a price of 5200 DKK.

Motherboard

I ended up with the Asus ROG CROSSHAIR VIII HERO. It is used in a number of review / overclocking projects using the AM4 platform. For this build, I don’t intend to use the overclocking features, but rely on that the enhanced power capability (16 power stages) compared to other boards also provide enhanced stability.

For connectivity it has 8 x *USB 3.2 Gen 2 and 4 x USB 3.2 Gen1, 2.5 G Ethernet, A number of PCIe 4.0 slots (including either x16 from CPU or dual x8 from CPU.

I also have very good experience with Asus boards previously, and it has one of the best sound options (SupremeFX S1220 codec, ESS ES9023P) for the AM4 platform.

Case

Here I choose the be quiet! Dark Base 700. Mostly because of its space and low noise. If needed it can contain an E-ATX board (Threadripper) and have the option for seven 3.5″ hard drives and fourteen 2.5″ drivers. (Only ships with option for three 3.5″ drives and nine 2.5 drives). I only expect to use four 2.5 drives as a start.

CPU cooler

Noctua NH-U14S is the choice here, in combination with an extra NF-A15 fan for a push-pull config. Again quietness is the reason for this. It is used in many Threadripper builds, making i able to handle much more heat than the chosen CPU delivers, and with fan control it gives a very quite system.

Storage

Having only 4 lanes of PCIe 4.0 for storage I ended up with a combination of a single M.2 drive and 2 SSD. To help with the quiteness I also opted for no mechanical drives, as the vibration and noise from a spinning disk can be significant. Specifically when the disks starting to be worn.

For the main drive I selected the the Corsair SSD MP600 1TB. It is a PCIe 4.0 drive giving me up to 4250 MB/s for writes and 4950 MB/s for reads. I might have been able to mange with the 500G version, but again as I only have 4 lanes for fast storage, and as the 1TB is faster than the 500G version I choose the 1TB version.

For general storage I opted for the cheaper SSD in the form of 2 times 2TB of Crucial SSD MX500. The main reason for this disk compared to many others is DRAM cache and 3D TLC NAND. Many disks, including disks in the same price range does not have any cache and is using the QLC flash technology, resulting in slower performance, and often bad TBW. The TBW for the 2TB disk I have selected is 700TB or 383 GB per day for 5 years.

With this I end up having 1 TB of extremely fast storage, and 4 TB of reasonable fast storage (above 500 MB/s). The 4 TB I can either use in a 2 disk config, or configure as RAID 1 for added data protection against disk failure.

PSU

Here I went for the Seasonic Focus PX 850. It is a modular PSU having among others a very silent mode up to around 50% load, and is able to run in fanless mode when the load goes below 30%.

Seasonic is also known for their stability and gives 10 years of waranty.

GPU

Here I choose to keep my old Nitro+ RX 570. Being a GCN4 based card, means it have superb Linux support, and as I don’t game I only need the card for driving a solid dual monitor setup.

Summary

To sum up my selection it ends with the following.

  • Ryzen 9 – 5950x with 16 cores / 32 threads
  • 128 DDR4 memory with timing 16-18-18-38
  • PCIe gen 4 for all peripherals
  • 1 TB M.2. drive with above 4 GB/s for main storage
  • 2 x 2TB SSD for general storage

Currently I am waiting on parts, where I expect the CPU to be the last part I receive. Expect it to be early December. I will follow up with a post when build it and run some tests.

Remove duplicate of files

I had a number of folders on my MacBook. Each of them a full backup from a mobil phone, from different dates. To clean it up, I decided to only keep the elements in each folder, not present in the next folder.

To do this, I started by creating a diff output

diff -q -s folder1/ folder2 > ~/Desktop/diffOutput.txt

This output contained both the uniq files, but also list the identical files.

So to get a list of the identical file names, I used grep and cut, like the following.

grep identical diffoutput.txt | grep -e "folder1/.* and" -o | cut -f2 -d'/' | cut -f1 -d' ' > ~/Desktop/diffParsed.txt

The last thing is to remove the identical files.

cat ~/Desktop/diffParsed.txt | xargs rm

Preparing video for editing

I had the pleasure to work with some video editing resently. The background is that my sister got some 8mm cine film from our youth converted to a DVD. As this DVD contains clip from many different 8mm cine films mixed together, I would like to split them up and be able to combine them in a new way.

I got the DVD as a dmg image from a mac, so the first thing was to see what kind of dmg image it was.

xxx@stas ~/Delta $ file film-compressed.dmg
film-compressed.dmg: VAX COFF executable - version 8343

This type is a compressed image, so the first thing I need is to decompress it. For this a tool named dmg2img is available in the Gentoo portage tree.

dmg2img -v film-compressed.dmg film-uncompressed.iso

Then I can mount the image and copy the contents out. Now I have the raw data for my videos

sudo mount -o loop -t auto film-uncompressed.iso isoMount

Though was the vob files with error in the form of wrong length. Opening a file in vlc or another tool indicated a length of 9 seconds even though the clip was 3 minutes long. I fixed it together with a conversion using ffmpeg. So a quick script later, my computer was working on the conversion.

#!/bin/bash
 
FILES=./isoContents/VIDEO_TS/*1.VOB
 
for f in $FILES
do
    OUTPUT_FILE=`echo $f | cut -f 4 -d "/" | cut -f 1 -d "."`
    OUTPUT_FILE="./mp4Files/${OUTPUT_FILE}.mp4"
    echo "Outputfile $OUTPUT_FILE"
    ffmpeg -i $f -sameq -vcodec libx264 -acodec libfaac $OUTPUT_FILE
done

Now I have prepared my data, and is ready to do the editing. For this I use kdenlive.

Being the “Timothy McGee” of the family

As a fan of NCIS, I have often seen how Timothy McGee and Abby Sciuto is doing their forensic work on computers, where they need to find some information to solve a case. Of cause they are in a crises, and have some magical graphical interfaces telling them all sort of information extremely fast. In the real world things is a bit different.

I decided to write this post, while recovering some mails for my uncle. He had an old computer, which started spontaneous shutdowns because of a thermal event. So he bought a new computer and asked me for help with getting the old mails. At that point I thought it was an easy job, just involving getting the hard drive, put it in my disk cradle, copy the outlook data file to the new computer and import it. When I dismantled the computer, I noticed the hard drive was a bit older then first expected. It had an IDE interface instead of a SATA interface, so my disk cradle idea did not work. No problem, I will just put it in a computer with IDE interface and access the files from this computer. Though luck, when I booted in Windows 7 check disk failed, and asked if I wanted to format the hard drive. Not the question I had hoped for.

The task just got bigger than first imagined. So the first thing would be to prevent any more damage to the data and file system on the disk. So I put the hard drive in my trusty Gentoo Linux machine and did a raw copy of the partition using dd.

sudo dd if=/dev/sdi1 of=/home/frosteyes/charlie/Bo/diskImage.img

Now having the disk image, I can work on getting the mails without risking to destroy anything on the physical disc. I am using testdisk and photorec. They can be installed by emerge testdisk on Gentoo Linux.

Using testdisk on the image, it shows that the MFT and MFT mirror are bad. Failed to repair them. This was identical with what chkdsk had reported earlier. So no usable master file table (MFT).

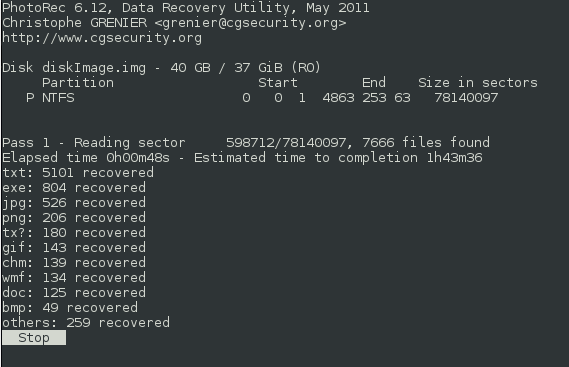
The next task was to run photorec on the disc image as seen below. photorec is a recovery program, which among other file types can detect pst files without having a file sytem on the disk. It resulted in a huge number of folders with files, including a number of pst files.

photorecRunning
photorec is running on the disc image

An then finding the pst files I was looking for.

frosteyes@stas ~/charlie/Bo $ find ./ -iname *.pst | xargs ls -l
-rw-r--r-- 1 frosteyes users 81282048  5 maj 17:16 ./recup_dir.133/f9541960.pst
-rw-r--r-- 1 frosteyes users   271360  5 maj 17:19 ./recup_dir.171/f13814104.pst
-rw-r--r-- 1 frosteyes users 24396800  5 maj 18:46 ./recup_dir.374/f47280112.pst
-rw-r--r-- 1 frosteyes users  1033216  5 maj 18:49 ./recup_dir.414/f54353688.pst
-rw-r--r-- 1 frosteyes users   271360  5 maj 18:50 ./recup_dir.416/f55373800.pst

Before handing over the files to my uncle I just tested the files using lspst from libpst. Can be installed with emerge libpst on my Gentoo system. It showed that the pst files contains the needed emails.

So all in all it ended up being more forensic work than expected, but quite fun and I felt a bit like McGee from NCIS.